

Duration time – 45 min
Difficulty – EASY
Preparation
Modules:
- LOFI Brain
- Servo motor
- Red LED
- Button
- Light sensor
- USB cable
PAY ATTENTION – To make this project you need a laser pointer (usually used for presentation and playing with cats) which is not included in the CODEBOX Starter kit.
Robot construction
Connections:
- Light sensor → INPUT3
- Button → INPUT1
- Servo motor → OUTPUT1
- Dioda → OUTPUT3
- Zasilanie robota → kabel USB → wyjście USB w komputerze
CODING
How does the shooting range work?
The shooting range is a very simple and funny game which trains your manual precision skills. You aim at the light sensor with a laser pointer, if you hit it you get a point, the robot beeps, blinks and it`s arm turns in a new random position.
To control reactions of the shooting range we will use conditional IF/ELSE block.

Hitting the target is detected by the light sensor. If the value read by the light sensor surpass 75 we perform actions – setting the arm to new position and adding a point.

Actions performed after hitting the target:
- LED lights up
- Setting servo to random position
- The buzzer beeps
Additionally lets make the code pause for a while so the servo has time to get to new position.

In time when the light sensor readings are below 75. We turn off the LED and buzzer.

In fact that is all when it comes to the shooting range mechanics. Try playing with it for a while.
Game score
It is no game when you cannot beat a high score. Each time the player hits he gets a point. We will use a drawing board to display the score.
First we have to declare a VARIABLE which will be used to store the score value – lets give it a name SCORE. To raise the score each time the player hits the target we will use a block CHANGE “SCORE” BY 1.

Teraz czas na wyświetlanie naszej punktacji. Będziemy potrzebowali paru bloków z zakładki RYSOWANIE.
Co trzeba wykonać?
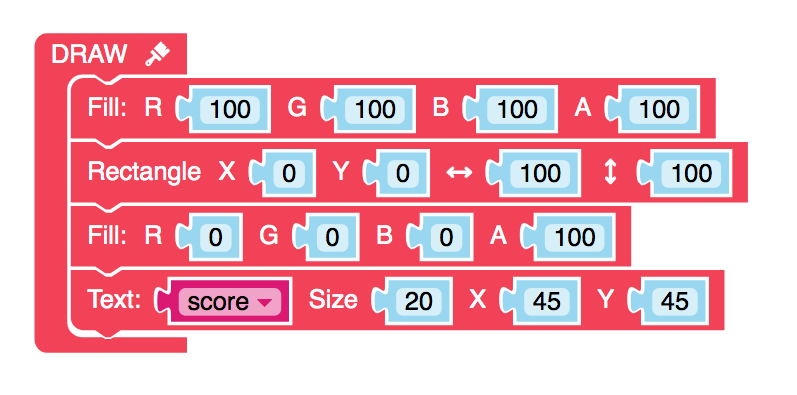
To display the score we will use blocks from the DRAWING category and a correct order of actions.
- Set paint color to white (100,100,100)
- Clear the drawing board with a rectangle
- Set paint color to black (0,0,0);
- Display text containing value of SCORE
We have to draw the rectangle to clear the drawing board each time the frame is refreshed otherwise the text would be drawn on top af the last drawing making it blurry as time goes on.

To display the SCORE we use block TEXT but first we have to set the text color do distinguish it from the backcround.
ANother nice feature to have would be resetting the SCORE. To do this we will use a button module connected to INPUT1. When the button is not pressed it reaturns reading around 0-5, when we press it it returns value of 100. Using the conditional block we will make a rule that when button reading is higher than 50, the SCORE is set to 0.

making it more difficult
To make the game more entertaining we can boost it`s difficulty level by adding some random movements to the shooting range arm independently from hitting the light sensor with laser pionter. In some random time periods the servo will be set to new random position.
We are going to use some dirty hack to achieve it – the part of code that changes arm position will bet executed inside a block PLAY – parallel loop used usually for sound.

If we put a WAIT block inside a PLAY loop it is executed independently from the main REPEAT loop, so it will not affect reading of the light sensor and detecting the hits.
 Copyleft: LOFI Robot 2019
Kontakt:
Copyleft: LOFI Robot 2019
Kontakt: