

Duration – 45 min
Difficulty – Easy
Introduction
Today we will make a simple and very engaging experiment. We will use a hidden feature of our button module to inspect everyday objects for electric conductivity.
Preparation
Modules:
- LOFI Brain
- LED module
- Button module
- Crocodile cables x2
- USB cable
Robot construction – you can either make this lesson with bare button module connected to LOFI Brain controller or use any other robot construction which contains a button module (eg. robot head).
Connections:
- Button → INPUT1
- LED → OUTPUT3
- Power supply → USB cable → computer
- Crocodile cables connected to the button module

CODING
Button module in addition to its regular function can be extended with crocodile cables and short-circuiting them will act as pressing the button. What is more sensitivity of this module is very high so even things that conduct electricity in a very limited way when connected to crocodile cables can be used as physical “buttons”. This way we can experiment with some unusual objects such as fruits, vegetables, plants or even human skin – DO NOT WORRY – there is no chance for an electric shock – electric load going through the module is very, very, very low.
Our program will make a LED module light up whenever the crocodile cables touch an object which is able to conduct electricity. We will use conditional IF/ELSE block to set the led according to button module readings.

This time condition is met when reading from the button module is higher than 30.
When the button is pressed the reading from the module is 100 – we simply close the circuit, but when we use the crocodile cable on objects, the reading depends on the object you clip them to – if you clip the cables to something metal then it will conduct electricity perfectly and the reading will be 100, but if you clip the cables to some kind of fruit – conduction of electricity will be medium (it is the water in the fruit that conducts the electricity), so the reading will vary ~20-50 or more depending on the conditions.
Try to experiment with clipping crocodile cables to anything you will see around – remember that each time the object has to close the circuit between two cables.
Try:
- Kitchen utensils.
- Fruits and vegetables.
- Hold the cables (touch metal parts) with both of your hands – notice what happens if you grip them firmly, or when your hands are dry or sweaty.
Give one cable to another person, and holding the other cable with your hand try touching hands with each other.

Making some noise
As soon as we measured electric conductivity and turned it into a number (between 0 and 100) we can then turn it into anything we want – for example, we can change it into sound.
It is as simple as putting readings from our button as a parameter of a PIANO block from sound category.

If your signal is a bit low and does not go up to 100 you can amplify it by simply multiplying eg. by 1.5

Try drawing something on paper with a thick layer of pencil (soft pencil – B2, B3 and up would be the best). Pencil core is made of graphite which conducts electricity. Touch the drawing with crocodile cables to make a musical instrument with a pencil drawing.
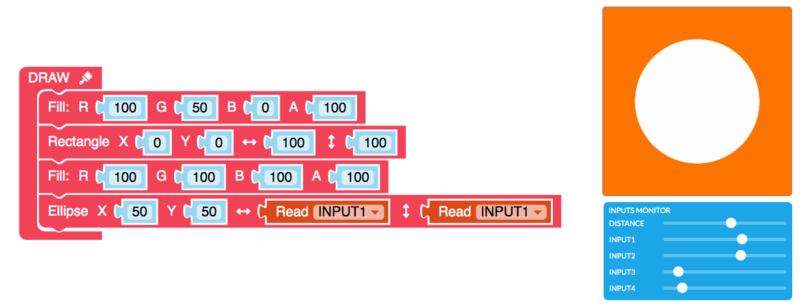
Visualization
If we can make sound with electricity we can make visuals as well.
Let’s add some orange background. Set color to orange (100,50,0) and draw a rectangle covering whole drawing area.

Our input will be visualized by a white circle. Change the fill color to white (100,100,100) and draw an ellipse in the middle of the drawing area (X:50,Y:50) width and height of the ellipse will be the same as reading from the button module.
In our last experiment let’s display the reading at the center of the drawing board. Change the fill color to black. Note that reading from INPUT1 is used in two different ways – as a text value to display but also as the size to the text.

 Copyleft: LOFI Robot 2019
Kontakt:
Copyleft: LOFI Robot 2019
Kontakt: